Spooktacular Delights: Crafting the Perfect Halloween Sugar Cookies
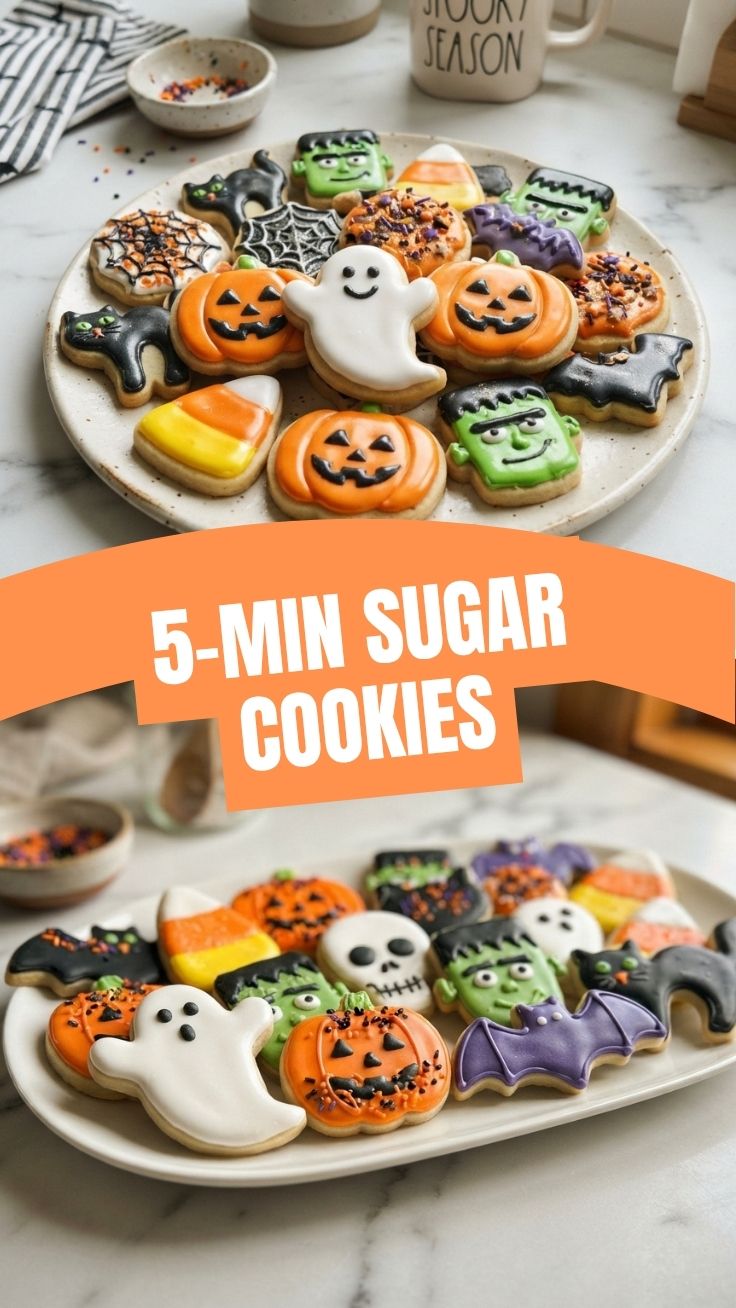
Are you ready to transform your kitchen into a ghoulishly delightful bakery this Halloween? Ditch the store-bought treats and unleash your inner pastry wizard with homemade Halloween Sugar Cookies! There’s an unparalleled joy in creating edible art from scratch, especially when it comes to festive goodies. Not only do you control the quality of ingredients, but the process of Halloween cookie decorating offers a fantastic opportunity for creative expression and cherished memories with family and friends. This comprehensive guide will walk you through everything you need to bake and adorn the most enchanting spooky treats, making this Halloween truly unforgettable.
Ingredients & Kitchen Tools
To embark on your Halloween baking adventure, gather the following:
- 2 ½ cups All-Purpose Flour: The structural backbone of our cookies. Sift for a lighter texture.
- ½ teaspoon Baking Powder: Helps the cookies rise slightly, keeping them tender.
- ¼ teaspoon Salt: Enhances all the flavors.
- 1 cup (2 sticks) Unsalted Butter, softened: Essential for a rich, tender crumb. Ensure it’s truly softened, not melted.
- 1 ½ cups Granulated Sugar: Provides sweetness and contributes to the cookie’s texture.
- 1 large Egg: Binds the ingredients together.
- 1 teaspoon Vanilla Extract: Adds a classic, comforting flavor. Almond extract can be an excellent substitute for a different nuance.
- For Royal Icing:
* 3 large Egg Whites (or 4 tablespoons Meringue Powder + 6 tablespoons warm water): Provides the base for sturdy, quick-drying icing. Meringue powder is a safe alternative to raw egg whites.
* 4 cups Powdered Sugar, sifted: Essential for smooth, lump-free icing.
* ½ teaspoon Vanilla Extract: For flavor.
* ¼ teaspoon Cream of Tartar (optional): Stabilizes royal icing, producing a glossier finish.
* Gel Food Coloring: For vibrant, festive colors. Liquid food coloring can thin the icing too much.
- Kitchen Tools: Stand mixer or hand mixer, rolling pin, Halloween-themed cookie cutters (ghosts, pumpkins, bats, witches’ hats), parchment paper, baking sheets, cooling racks, piping bags with various tips (or squeeze bottles), small bowls for icing colors, spatulas.
Prep Time & Cooking Schedule
- Prep Time: 30 minutes (Dough preparation) + 2 hours (Chilling dough) + 60 minutes (Decorating)
- Cook Time: 8-10 minutes per batch
- Resting Time: 15-20 minutes after baking before transferring to racks; 4-6 hours for royal icing to fully set.
Planning is key! Prepare the dough ahead of time – it can chill overnight. This allows you to spread out the fun, baking one day and dedicating another to the artistic Halloween cookie decorating.
Step-by-Step Instructions
1. Cream Butter and Sugar: In a large bowl or stand mixer, beat the softened butter and granulated sugar together on medium speed until light and fluffy (about 3-4 minutes).
2. Add Wet Ingredients: Beat in the egg and vanilla extract until well combined, scraping down the sides of the bowl as needed.
3. Combine Dry Ingredients: In a separate bowl, whisk together the all-purpose flour, baking powder, and salt.
4. Gradually Add Dry to Wet: With the mixer on low speed, slowly add the dry ingredients to the wet ingredients until just combined. Be careful not to overmix, as this can lead to tough cookies.
5. Chill the Dough: Divide the dough in half, flatten each half into a disc, wrap tightly in plastic wrap, and refrigerate for at least 2 hours, or up to 2 days. This is crucial for preventing spread and achieving perfectly shaped Halloween Sugar Cookies.
6. Roll and Cut: Preheat oven to 375°F (190°C). Line baking sheets with parchment paper. On a lightly floured surface, roll out one disc of chilled dough to about ¼ inch thick. Cut out shapes using your Halloween cookie cutters.
7. Bake: Carefully transfer the cut-out cookies to the prepared baking sheets, leaving about 1 inch between them. Bake for 8-10 minutes, or until the edges are lightly golden.
8. Cool: Let the cookies cool on the baking sheets for 5 minutes before transferring them to a wire rack to cool completely.
9. Prepare Royal Icing: In a clean bowl, whisk egg whites (or meringue powder + water) until foamy. Gradually add the sifted powdered sugar on low speed. Increase speed to high and beat until stiff, glossy peaks form. Stir in vanilla and cream of tartar (if using). Divide icing into separate bowls and color with gel food coloring.
10. Decorate: Once cookies are completely cool, get creative with your Halloween cookie decorating! Use piping bags or squeeze bottles to outline shapes, then flood with thinner icing. Allow each layer to dry before adding details.
Nutritional Benefits & Advantages
While these are undeniably a treat, making your own Halloween Sugar Cookies offers advantages. You avoid artificial preservatives and excessive additives often found in store-bought options. Using real butter and vanilla extract provides a more wholesome flavor profile compared to alternatives. Plus, the joy of baking and sharing homemade treats can positively impact mental well-being and foster community.
Tips, Variations & Cooking Advice
- Flavor Boost: Add a pinch of nutmeg or cardamom to the dough for an autumnal twist.
- Gluten-Free: Substitute the all-purpose flour with a 1:1 gluten-free baking blend that contains xanthan gum.
- Dairy-Free: Use a good quality plant-based butter substitute.
- Spice Cookies: Add 1 teaspoon of ground cinnamon and ½ teaspoon of ground ginger to the dry ingredients for a spiced sugar cookie.
- Icing Consistency: For outlining, your royal icing should be thick enough to hold its shape. For flooding, add a tiny bit of water at a time until it’s the consistency of honey (it should disappear into itself slowly when a line is drawn through it).
Common Mistakes to Avoid
- Overmixing the Dough: Leads to tough, dense cookies. Mix until just combined.
- Not Chilling the Dough: Causes cookies to spread excessively in the oven, losing their defined shapes.
- Rolling Dough Too Thin/Thick: Too thin, and they’ll be brittle; too thick, and they won’t cook evenly. Aim for ¼ inch.
- Overbaking: Results in dry, crumbly cookies. Pull them out when the edges are just turning golden.
- Decorating Warm Cookies: The heat will melt your royal icing. Ensure cookies are completely cool.
Storage & Meal Prep Tips
Once your magnificent Halloween Sugar Cookies are baked and decorated, allow the royal icing to fully set for 4-6 hours (or even overnight) before stacking. Store them in an airtight container at room temperature for up to 5-7 days. For longer storage, undecorated cookies can be frozen for up to 3 months. Thaw at room temperature before decorating. You can also freeze raw cookie dough wrapped tightly for up to 3 months; thaw in the refrigerator before rolling and baking.
Conclusion
Crafting homemade Halloween Sugar Cookies is more than just baking; it’s an enchanting experience that blends culinary skill with artistic flair. From the simple joy of mixing dough to the intricate details of Halloween cookie decorating, each step adds to the festive spirit. We hope this guide empowers you to create edible masterpieces worthy of any spooky celebration. Share your dazzling creations with us in the comments below! Happy haunting, and happy baking!
FAQs
Q1: Can I use different extracts for flavor?
A1: Absolutely! Lemon, orange, or even peppermint extract can create unique flavor profiles for your sugar cookies.
Q2: My royal icing is too thick/thin. How do I fix it?
A2: If too thick, add water a tiny drop at a time until desired consistency. If too thin, beat in a small amount of additional sifted powdered sugar.
Q3: How can I prevent my cookies from sticking to the counter when rolling?
A3: Lightly flour your surface and rolling pin. You can also roll the dough between two sheets of parchment paper for mess-free rolling.
Q4: Can I make these cookies vegan?
A4: Yes, by using a plant-based butter substitute and a flax egg (1 tbsp ground flaxseed mixed with 3 tbsp water, let sit for 5 minutes) instead of a regular egg. For royal icing, use meringue powder, or explore aquafaba-based royal icing recipes.
Q5: How do I get distinct shapes without the cookies spreading?
A5: Ensure your butter isn’t too warm and that your dough is thoroughly chilled. Also, avoid overworking the dough, as this develops gluten, which can lead to spreading.