Unlock Summer’s Best: The Ultimate Guide to Perfect Grilled Corn on the Cob
Ever wondered how to unlock that irresistible smoky sweetness that makes a summer BBQ truly unforgettable? The secret often lies in a simple yet sensational side dish: perfectly Grilled Corn on the Cob. Beyond just a side, this culinary delight is a celebration of seasonal flavors, a vibrant addition to any meal, and surprisingly easy to master at home. Forget bland, watery boiled corn; we’re talking about husks kissed by fire, kernels bursting with caramelized goodness, and a buttery-spicy finish that will have everyone asking for your secret. Preparing your own grilled corn not only guarantees freshness but also allows you to customize the flavor profile to your heart’s desire, whether you prefer classic simplicity or adventurous spice. And when you’re exploring the best grilled corn recipes out there, this method stands out for its consistent deliciousness.
Ingredients & Kitchen Tools
To embark on your journey to perfect Grilled Corn on the Cob, gather these essentials:
- Fresh Corn on the Cob (4-6 ears): Look for bright green husks, plump kernels, and firm texture. The fresher, the better!
- Unsalted Butter (1/2 cup, softened): Essential for rich flavor and helping seasonings adhere.
- Mayonnaise (1/4 cup, optional but recommended for elote-style): Adds creaminess and tang.
- Cotija Cheese (1/4 cup, crumbled, optional for elote-style): Salty, crumbly goodness. Feta is a good substitute.
- Chili Powder (1/2 tsp): For a warm, earthy spice. Adjust to your preference.
- Smoked Paprika (1/2 tsp): Adds depth and a beautiful color.
- Garlic Powder (1/4 tsp): Enhances savory notes.
- Lime (1-2, fresh): For juice and wedges—brightens all the flavors.
- Fresh Cilantro (2 tbsp, chopped, optional): A pop of freshness.
- Salt & Black Pepper (to taste): Basic seasoning, always adjust.
- Olive Oil (1 tbsp): For brushing the grill grates.
Kitchen Tools & Utensils:
- Grill (charcoal or gas): The star of the show.
- Tongs: For safely turning the corn.
- Small Mixing Bowl: To combine butter/mayo mixture.
- Basting Brush: For applying the flavorful coating.
- Serving Platter: For presenting your masterpiece.
- Corn Holders (optional): For easier eating.
#### Optional Substitutions:
- Vegan Butter/Oil: For a dairy-free version.
- Nutritional Yeast: For a cheesy, dairy-free flavor instead of Cotija.
- Cayenne Pepper: For extra heat if you like it spicy.
Prep Time & Cooking Schedule
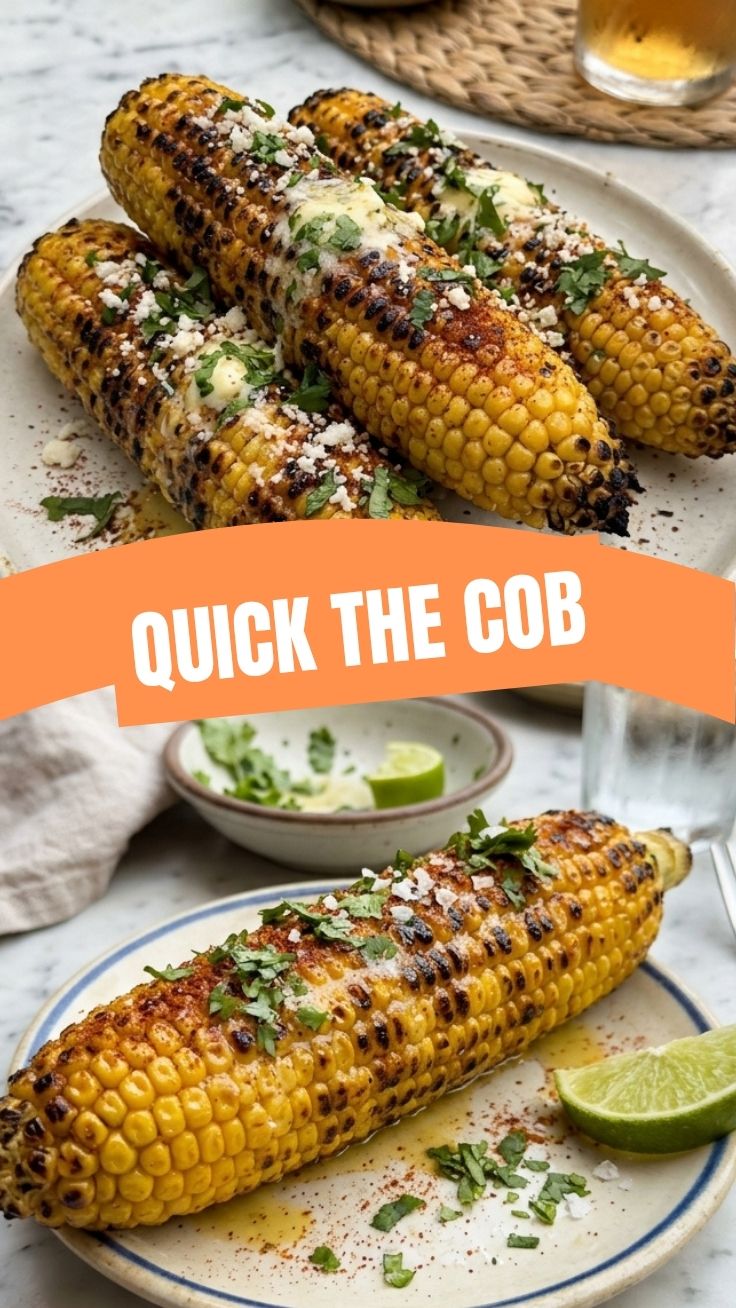
Achieving perfectly Grilled Corn on the Cob is surprisingly quick once you have your grill ready.
- Prep Time: 10 minutes (for husking and preparing the seasoning mixture)
- Grill Preheat Time: 10-15 minutes
- Cook Time: 10-15 minutes
- Resting Time: 2-3 minutes (before serving to allow flavors to meld)
This recipe is perfect for busy weeknights or as a quick addition to your weekend BBQ spread. You can easily prepare the seasoned butter/mayo mixture ahead of time, saving precious minutes when it’s time to grill.
Step-by-Step Instructions
1. Prepare the Corn: Gently pull back the husks on each ear of corn, but do not remove them. Remove all silk strands. You can either leave the husks attached (they act as a natural handle and keep the corn moist) or remove them completely before grilling. If leaving the husks, soak the corn in cold water for 15-20 minutes. This prevents the husks from burning rapidly and steams the corn slightly. If removing husks, simply proceed to the next step.
2. Preheat Your Grill: Preheat your gas grill to medium-high heat (around 400-450°F / 200-230°C) or prepare a charcoal grill for direct heat. Lightly brush the grill grates with olive oil to prevent sticking.
3. Create the Flavorful Coating: In your small mixing bowl, combine the softened butter, mayonnaise (if using), chili powder, smoked paprika, garlic powder, salt, and black pepper. Mix thoroughly until well combined. This is your secret weapon for incredible flavor!
4. Grill the Corn: Place the corn directly on the preheated grill grates. Cook for 10-15 minutes, turning every 3-4 minutes, until the kernels are tender, slightly charred, and bright yellow. The charring is key to that smoky flavor in your Grilled Corn on the Cob.
5. Season and Serve: Once cooked, remove the corn from the grill. Immediately brush the seasoned butter/mayo mixture generously over each ear. Squeeze fresh lime juice over the corn, then sprinkle with crumbled Cotija cheese and chopped cilantro (if using). For those seeking diverse grilled corn recipes, you might also consider a sprinkle of hot sauce or a dash of Tajín for an extra kick. Serve hot and enjoy!
Nutritional Benefits & Advantages
Corn on the cob, especially when grilled, offers more than just deliciousness. It’s a good source of fiber, which aids digestion and can help regulate blood sugar levels. It provides essential vitamins and minerals like Vitamin C, B vitamins (including folate), and magnesium. Grilling preserves many of these nutrients and can even enhance the antioxidant properties of the corn through the Maillard reaction (the browning process that creates complex flavors and aromas). Furthermore, preparing it at home allows you to control the amount of butter and salt, making it a healthier option than many restaurant versions.
Tips, Variations & Cooking Advice
- Spice it up: Add a pinch of cayenne pepper or a dash of your favorite hot sauce to the butter mixture for extra heat.
- Herbaceous Twist: Incorporate finely chopped fresh herbs like parsley, chives, or oregano into your butter blend.
- Sweet & Savory: Drizzle a touch of honey or maple syrup over the corn for a sweet contrasting note.
- Foil Packet Grilling: If you prefer less char and more steam, wrap husked corn in foil with a pat of butter before grilling. This method results in tender, less smoky corn.
- Broiler Method: No grill? No problem! Cook the corn under a hot broiler, turning frequently, for a similar charred effect.
- Make it a Meal: Serve alongside grilled chicken, fish, or a vibrant summer salad for a complete and satisfying meal.
Common Mistakes to Avoid
- Overcooking: Corn can quickly become dry and tough if grilled for too long. Keep an eye on it and aim for tender-crisp kernels.
- Forgetting to Oil Grates: This leads to sticking, tearing kernels, and a frustrating grilling experience.
- Under-Seasoning: Don’t be shy with the butter mixture and other toppings. The corn needs bold flavors to shine.
- Grilling Cold Corn: Allow corn to come to room temperature for about 15-20 minutes before grilling for more even cooking.
Storage & Meal Prep Tips
Leftover Grilled Corn on the Cob can be stored in an airtight container in the refrigerator for up to 3-4 days. To reheat, you can grill for a few minutes, microwave until warm, or even cut the kernels off the cob and sauté them quickly in a pan with a little butter. You can also freeze cooked corn kernels (off the cob) for up to 3 months. Simply thaw and use in soups, salsas, or stir-fries.
Conclusion
Mastering the art of Grilled Corn on the Cob is truly a game-changer for any summer cookout. With its irresistible smoky sweetness and customizable flavor profile, this simple side dish has the power to elevate an ordinary meal into an extraordinary culinary experience. By following these easy steps, you’ll be consistently turning out perfectly charred, juicy, and delicious corn that will have everyone reaching for seconds. So fire up your grill, embrace the glorious flavors of summer, and explore how this recipe truly makes a difference among all the other grilled corn recipes you might encounter. Try this recipe today and share your delicious results with us – we can’t wait to see your perfectly grilled creations!
FAQs
Q1: Do I have to soak the corn before grilling?
A1: If you’re grilling with the husks on, soaking is highly recommended. It prevents the husks from burning too quickly and creates a steam effect that helps cook the corn inside. If grilling naked corn (husks removed), soaking isn’t necessary.
Q2: Can I use frozen corn for this recipe?
A2: While fresh corn on the cob is ideal, you can use frozen corn on the cob. Thaw it completely, pat it dry, and then proceed with the grilling steps. The charring will still add great flavor.
Q3: What if I don’t have Cotija cheese?
A3: Feta cheese is an excellent substitute for Cotija, offering a similar salty, crumbly texture. If you prefer a milder cheese, finely grated Parmesan can also work.
Q4: How do I know when the corn is done?
A4: The corn is typically done when the kernels are tender when pierced with a fork, and you see some nice charring or browning on all sides, indicating that sweet caramelization has occurred.
Q5: Can I prepare the seasoned butter mixture in advance?
A5: Absolutely! You can mix the butter and seasonings up to 2-3 days in advance and store it in an airtight container in the refrigerator. Let it come to room temperature slightly before brushing onto the hot corn for easier application.